seun asked in an old post of mine, Interfacing with MySQL via Excel; whether it’s possible to submit data from Excel into MySQL.
Yes, it is very much possible to do this. In fact, I’ve written a tutorial on how to do this with the help of VBA.
First, we create the table that we will use to store the data. The SQL statement below will create our sample table called tutorial. Just copy and paste it into your favourite MySQL IDE or phpMyAdmin.
CREATE TABLE IF NOT EXISTS `tutorial` (`id` int(11) NOT NULL auto_increment,`title` varchar(255) NOT NULL,`author` varchar(255) NOT NULL,`price` float(4,2) NOT NULL,PRIMARY KEY (`id`)) ENGINE=InnoDB DEFAULT CHARSET=utf8 AUTO_INCREMENT=1 ;
Now that we’ve created the table, it’s time to store some data in it. The data must come from a source. In this example, I’ve created a list of book titles, along with the author and price of each book. Just copy the table below and paste it into an Excel worksheet.
| Title | Author | Price |
|---|---|---|
| How to Win Friends and Influence People | Dale Carnegie | 7.99 |
| The Magic of Thinking Big | David Schwartz | 10.17 |
| The Richest Man in Babylon | George S. Clason | 6.99 |
| As a Man Thinketh | James Allen | 9.95 |
| The Power of Your Subconcious Mind | Dr. Joseph Murphy | 7.49 |
| The Magic of Believing | Claude M. Bristol | 6.99 |
| It Works | R.H. Jarrett | 3.00 |
| Write It Down, Make It Happen: Knowing What You Want and Getting It | Henriette Anne Klauser | 10.52 |
| The Attractor Factor: 5 Easy Steps For Creating Wealth (Or Anything Else) From the Inside Out | Joe Vitale | 11.53 |
| The Science of Getting Rich | Wallace D. Wattles | 11.20 |
Now rename that sheet as Books. If you haven’t displayed your Visual Basic and Control Toolbox toolbars yet, now is a good time to do so. Go to the View top menu and navigate to Toolbars. Make sure Visual Basic and Control Toolbox are checked.
I prefer to place the toolbars at the top panel area so they’re out of the way of my Excel spreadsheet. You might want to do the same.
Next, click on the Properties icon of the Control Box toolbar and set the name of the Booksworksheet as wsBooks. You’ll get something like the screenshot below:

Now it’s on to some programming. But before we even start typing a single line of code, we need to understand what we’re trying to achieve with our code:
- Connect to the local MySQL database server
- Use the demo database
- Insert each line of the Books table into the tutorial database we created earlier
Connecting to the Database Server and Selecting the Correct Database
As we will be using VBA to perform our data insertion, we need a method to connect to the database server and ensure we’ve selected the correct database where the data will be inserted into.
There are three components necessary for us to perform MySQL database manipulation using VBA:
- MySQL Connector/ODBC
- Microsoft ActiveX Data Objects (ADO) Library
- The correct connection string to access the MySQL database
For this tutorial, I’m using MySQL Connector/ODBC 5.1. You can download it here. For Windows users, grab the MSI Installer version and just double click the file and go through the installation screen.
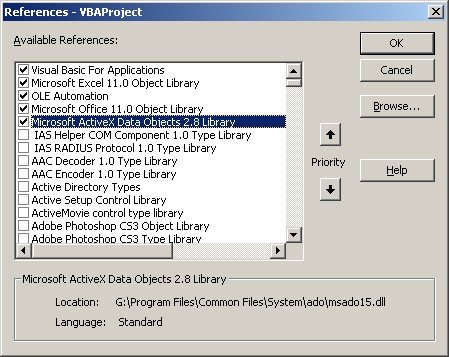
You’ll also need to reference to the Microsoft ActiveX Data Objects Library in your Excel Workbook. Fire up the Visual Basic Editor using Alt-F11. Go to the Tools top menu item of the Visual Basic Editor and choose References.
In the list of references, check the Microsoft ActiveX Data Objects 2.8 Library. Refer to the following screenshot:
Next, we will then start coding. The first thing we should do is to write a Sub procedure to connect to the database. This will be done using an ADODB connection.
First we need to declare the variable for the ADODB connection. Make sure you’ve double-clicked the wsBooks worksheet in the Project Explorer (if you can’t see it, press Ctrl-R). It should bring out a code window for that sheet.
In that sheet, enter the following code:
Dim oConn As ADODB.ConnectionPrivate Sub ConnectDB()Set oConn = New ADODB.ConnectionoConn.Open "DRIVER={MySQL ODBC 5.1 Driver};" & _"SERVER=localhost;" & _"DATABASE=yourdatabase;" & _"USER=yourdbusername;" & _"PASSWORD=yourdbpassword;" & _"Option=3"End Sub
You should replace yourdatabase, yourdbusername and yourdbpassword with your database name, your database username and the database password accordingly.
Test your ConnectDB Sub procedure by putting the cursor anywhere between the Sub statement and press F5 (this runs the Sub procedure). If an error popup appears, check that your MySQL service is running and that you’ve referenced to the Microsoft ActiveX Data Objects 2.8 Library.
Once the ConnectDB Sub procedure is working, we will code the Sub procedure to perform data insertion. Before that, we need to create a data sanitizing function to escape single quotes before inserting them into the database. This is necessary because improper quote escaping will cause data insertion to fail.
Here are the codes for the esc function that will escape single quotes from data to be inserted:
Function esc(txt As String)esc = Trim(Replace(txt, "'", "\'"))End Function
And now for the Sub procedure to perform data insertion:
Dim rs As ADODB.RecordsetPrivate Sub InsertData()Set rs = New ADODB.RecordsetConnectDBWith wsBooksFor rowCursor = 2 To 11strSQL = "INSERT INTO tutorial (author, title, price) " & _"VALUES ('" & esc(.Cells(rowCursor, 1)) & "', " & _"'" & esc(.Cells(rowCursor, 2)) & "', " & _esc(.Cells(rowCursor, 3)) & ")"rs.Open strSQL, oConn, adOpenDynamic, adLockOptimisticNextEnd WithEnd Sub
Now run the InsertData Sub procedure and you will see that it will insert the data from line 2 to line 11 of the Books worksheet into the tutorial table.
Hope this tutorial has given you a basic understanding on how to insert data into a MySQL database from Microsoft Excel using VBA. If you have any questions, just drop a comment below.